


¿Cómo configuro mi impresora DYMO 4XL LabelWriter en mi Windows PC?
A continuación le mostraremos los pasos para poder configurar exitosamente su nueva impresora DYMO 4XL LabelWriter con una computadora Windows PC.
Antes de conectar la impresora a la computadora, es necesario descargar el controlador.
Descarga el último controlador DYMO Label
Descarga el último controlador DYMO Label
-
Haz click en el siguiente enlace y descarga en la pestaña de Support/Apoyo el controlador más reciente para Windows en la página oficial de DYMO:
Enlace:
DYMO Connect for Desktop v1.3.2, Windows® o DYMO Connect para escritorio v1.3.2, Windows®

El archivo DCDSetup.1.3.2.exe se descargará y aparecerá en la parte inferior izquierda de su pantalla.

- Después de que se termine de descargar, haz click en el para abrir el archivo "DCDSetup.1.3.2.exe"
- Te preguntará si "¿Quieres permitir que esta aplicación realice cambios en tu dispositivo?" y hay que hacer click en "Sí".

Después de este paso, se abrirá el instalador del controlador DYMO Connect.
Instala el controlador DYMO Connect
- Continúa el proceso de instalación del controlador DYMO Label hasta el final con las configuraciones predeterminadas.
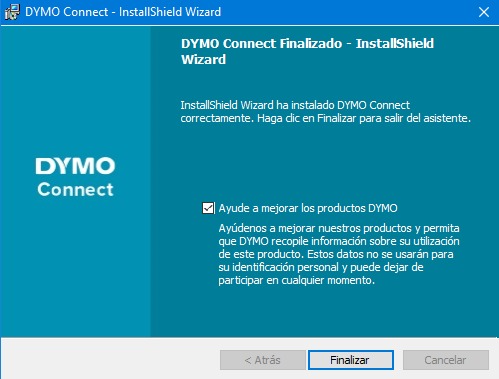
*IMPORTANTE*
Asegúrate de que hayas terminado todos los pasos de la instalación hasta el final antes de seguir los siguientes pasos de manual. Continua con el manual después de haber hecho click en el botón de "Finalizar".
Agrega la impresora DYMO 4XL a tus impresoras.
6. *IMPORTANTE*: Antes de seguir con los siguientes pasos hay que conectar la impresora a través de el cable USB.
7. Abre "Panel de Control".

8. Haz click en "Hardware y Sonido".

9. Después haz click en "Dispositivos e Impresoras"


De ahora en adelante, tu impresora DYMO 4xl LabelWriter esta correctamente configurada y se mostrará en tus impresoras.
14. ¡Listo! Ahora solamente falta el ultimo paso que es cambiar el formato en el que se generan las guías en Envia.com. Haz click aquí para ver el manual.